Super Bowl Desserts Mini Cheesecake Cups
Highlighted under: Cakes & Cravings
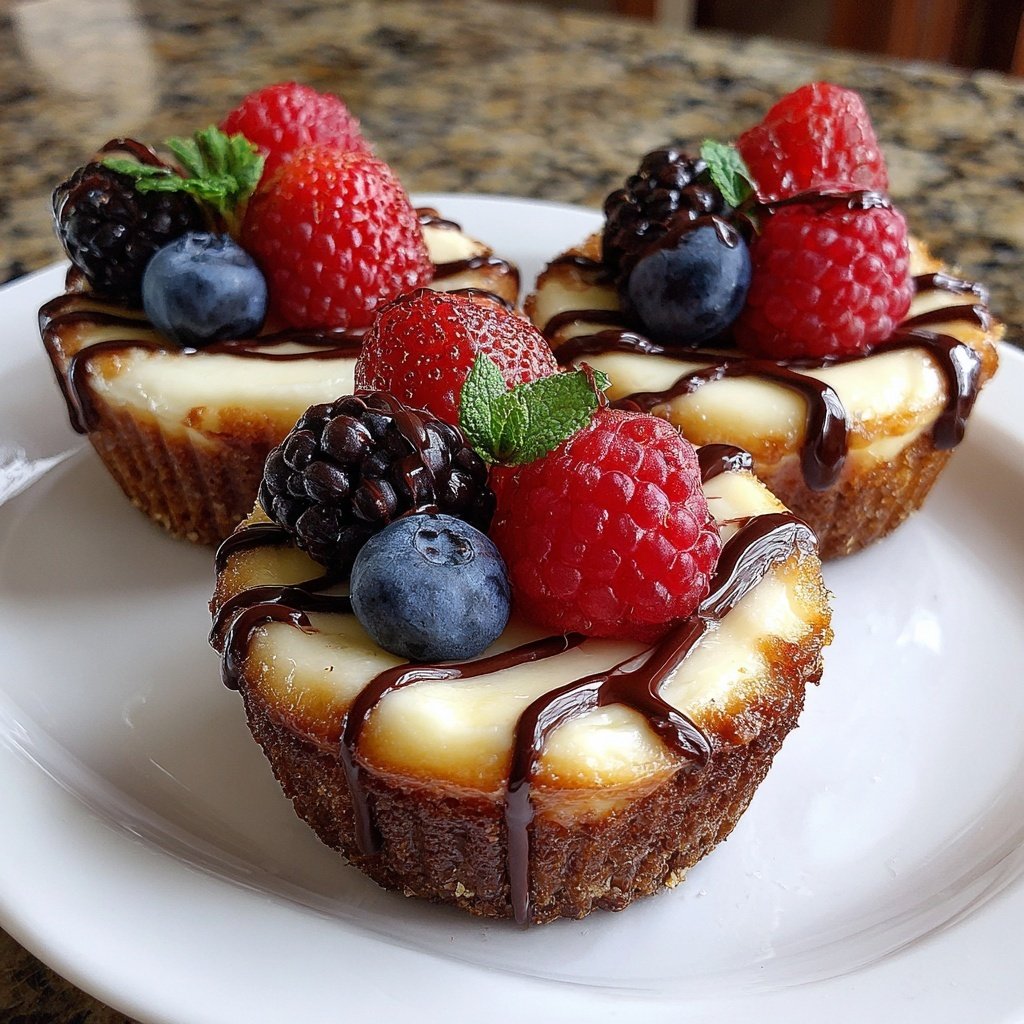
I love making these mini cheesecake cups for the Super Bowl; they are always a hit! The creamy texture combined with a crunchy graham cracker crust creates a delightful contrast that everyone enjoys. Plus, they are super easy to customize with different toppings, making them a favorite at our gatherings. With a mere 20 minutes of prep time, you can whip up a batch and let them chill while you focus on the game. Trust me, these will be the stars of the dessert table!
When I first made these mini cheesecake cups, I was amazed by how simple yet impressive they turned out. The key to their success is the balance of cream cheese and sour cream, providing that signature cheesecake richness without being overly heavy. I also found that using individual cups allows for easy serving and adds a charming touch to any gathering.
One of my favorite aspects of these treats is the endless topping possibilities. From fresh berries to drizzles of caramel or chocolate, you can easily switch things up based on what you have on hand or your guests' preferences. It's a definite crowd-pleaser!

Why You'll Love This Recipe
- Rich and creamy cheesecake goodness in a bite-sized format
- Customizable toppings for your personal touch
- Perfect for parties since they're easy to serve and eat
The Importance of Cheesecake Temperature
For the best cheesecake texture, it's crucial to start with softened cream cheese. This allows for a smooth, lump-free batter that results in a velvety filling. If your cream cheese is too cold, it won't incorporate well with the other ingredients, leading to a clumpy cheesecake. To soften cream cheese quickly, cut it into cubes and let it sit at room temperature for about 15-20 minutes, or microwave it for about 10-15 seconds.
Monitoring the baking temperature is also vital; bake at 325°F (160°C) for the perfect balance between a firm exterior and a soft center. Overbaking can result in cracks as it cools, so remove the mini cheesecakes from the oven when they appear set but still slightly jiggly in the center. They will firm up as they chill in the refrigerator.
Customizing Your Cheesecake Cups
One of the joys of these mini cheesecake cups is their versatility. You can easily switch up the toppings based on your guests' preferences or what you have on hand. Fresh fruit like strawberries, blueberries, or raspberries add a refreshing contrast to the creamy filling, not only enhancing the flavor but also providing a burst of color. I love to layer them for an impressive presentation that delights everyone's eyes.
Another delicious option is to mix in some flavorings into the cheesecake batter before baking. Try chocolate chips for a decadent version or a swirl of peanut butter or fruit preserves for a fun twist. Just remember to adjust the sweetness slightly if adding any extra sweet toppings to maintain balance.
Tips for Storage and Serving
After chilling these mini cheesecake cups for at least 2 hours, they can be stored in the refrigerator for up to 5 days, making them the perfect make-ahead dessert. If you wish to have them ready for a last-minute gathering, prepare the crust and filling a day ahead, bake, and allow them to chill overnight. When you're ready to serve, just top them fresh with berries or sauces; this keeps the flavors bright.
If you want to freeze your cheesecake cups, wrap each one tightly in plastic wrap and store them in an airtight container. They can be frozen for up to a month. To thaw, place them in the refrigerator the night before serving. Avoid topping them with fresh ingredients before freezing; simply add those right before serving to keep them fresh and vibrant.
Ingredients
Gather all your ingredients before you start for a smooth preparation process.
For the cheesecake cups:
- 1 cup graham cracker crumbs
- 3 tablespoons sugar
- 1/3 cup melted butter
- 16 oz cream cheese, softened
- 1 cup powdered sugar
- 1 teaspoon vanilla extract
- 2 large eggs
- 1 cup sour cream
For the topping:
- Fresh berries (strawberries, blueberries, raspberries)
- Chocolate syrup
- Caramel sauce
- Whipped cream
Make sure to adjust toppings based on preferences!
Instructions
Let's start by preparing the crust for our mini cheesecakes.
Preheat the Oven
Preheat your oven to 325°F (160°C). Line a muffin tin with cupcake liners.
Make the Crust
In a mixing bowl, combine graham cracker crumbs, sugar, and melted butter. Mix until the crumbs are evenly coated. Spoon the mixture into the bottom of each cupcake liner, pressing down to create a flat base.
Prepare the Cheesecake Filling
In a large bowl, beat together softened cream cheese, powdered sugar, and vanilla extract until smooth. Add the eggs, one at a time, mixing well after each addition. Finally, fold in the sour cream until well combined.
Fill and Bake
Pour the cheesecake batter over the crust in each liner, filling them about 3/4 full. Bake in the preheated oven for 10 minutes, then turn off the oven and let them cool inside for an additional 10 minutes.
Chill and Serve
Remove from the oven and let them cool completely at room temperature. Once cool, refrigerate for at least 2 hours before serving. Top with your choice of berries, chocolate syrup, or caramel sauce.
Enjoy your delightful mini cheesecake cups!
Pro Tips
- For a fun twist, try adding different flavor extracts to the cheesecake batter, like almond or lemon, to give it a unique taste.
Ingredient Substitutions
If you're looking for a gluten-free option, substitute the graham cracker crumbs with finely crushed gluten-free cookies or almond flour mixed with a little melted butter. This will maintain that delightful crumbly crust texture while catering to gluten sensitivities.
For a lighter version of the cheesecake, consider using Neufchâtel cheese in place of cream cheese; it contains less fat but still provides a creamy texture. You can also experiment with using Greek yogurt instead of sour cream for a tangier flavor and extra protein without sacrificing creaminess.
Scaling the Recipe
This recipe can easily be scaled up or down based on your needs. If you're hosting a large gathering, simply double the ingredient quantities and use two muffin tins to bake in batches. Conversely, if you're just making a few for yourself, feel free to halve the recipe; the mini cheesecakes can still be made in fewer liners, and baking time will remain the same.
When scaling down, keep in mind that the mixing and baking process is largely unchanged. However, be attentive to how full the liners are; filling them to the recommended 3/4 full remains the best practice to ensure proper cooking.
Questions About Recipes
→ Can I make these cheesecake cups ahead of time?
Absolutely! These can be made a day in advance and stored in the refrigerator until you're ready to serve.
→ What can I substitute for graham crackers in the crust?
You can use crushed cookies like Oreos or vanilla wafers for a different flavor profile.
→ How long can I store leftovers?
Leftover cheesecake cups can be stored in an airtight container in the fridge for up to 3 days.
→ Can I freeze these mini cheesecakes?
Yes, they freeze well! Just make sure to wrap them tightly and they can be stored in the freezer for up to 2 months.
Super Bowl Desserts Mini Cheesecake Cups
Created by: Lacey Montgomery
Recipe Type: Cakes & Cravings
Skill Level: Easy
Final Quantity: 12 servings
What You'll Need
For the cheesecake cups:
- 1 cup graham cracker crumbs
- 3 tablespoons sugar
- 1/3 cup melted butter
- 16 oz cream cheese, softened
- 1 cup powdered sugar
- 1 teaspoon vanilla extract
- 2 large eggs
- 1 cup sour cream
For the topping:
- Fresh berries (strawberries, blueberries, raspberries)
- Chocolate syrup
- Caramel sauce
- Whipped cream
How-To Steps
Preheat your oven to 325°F (160°C). Line a muffin tin with cupcake liners.
In a mixing bowl, combine graham cracker crumbs, sugar, and melted butter. Mix until the crumbs are evenly coated. Spoon the mixture into the bottom of each cupcake liner, pressing down to create a flat base.
In a large bowl, beat together softened cream cheese, powdered sugar, and vanilla extract until smooth. Add the eggs, one at a time, mixing well after each addition. Finally, fold in the sour cream until well combined.
Pour the cheesecake batter over the crust in each liner, filling them about 3/4 full. Bake in the preheated oven for 10 minutes, then turn off the oven and let them cool inside for an additional 10 minutes.
Remove from the oven and let them cool completely at room temperature. Once cool, refrigerate for at least 2 hours before serving. Top with your choice of berries, chocolate syrup, or caramel sauce.
Extra Tips
- For a fun twist, try adding different flavor extracts to the cheesecake batter, like almond or lemon, to give it a unique taste.
Nutritional Breakdown (Per Serving)
- Calories: 180 kcal
- Total Fat: 12g
- Saturated Fat: 7g
- Cholesterol: 40mg
- Sodium: 115mg
- Total Carbohydrates: 18g
- Dietary Fiber: 1g
- Sugars: 10g
- Protein: 3g